


By: Arif Khan
In this blog, I will explain you the DJANGO application development step by step. I have already explain the DJANGO project and application structure in INTRODUCTION TO DJANGO WEB FRAMEWORK. You can access the blog to get full understanding. Let’s start building our DJANGO application.
Important:
As you aware that python is open source and DJANGO is also open source framework. Therefore it is recommended to use virtual environment for building python backed applications.
Creating the development environment
- Create a project directory in OS.
- Switch into the project directory via CD in command line or via windows explorer.
- Here you need to create your virtual environment for your application, to create env use below command. The command will create and activate the env for you.
mkvirtualenv <environmentname>- If you already have env created then instead of writing mkvirtualenv command, use below command to activate the env.
workon <environmentname>- Now you can create your project in activated virtual environment to create project write “django-admin startproject <projectname>” hit enter. (This command will create a folder name as <projectname> in your project folder).
- You can see the contents of the newly created project by CD into that folder. You will notice that DJANGO created some default files in the folder for clear understanding about those files you can visit above introduction blog.
- While you are in the newly created project folder, you need to issue below command, to create your application.
- “django-admin startapp <application name>”. This command will create one more folder within project folder, this folder will be considered as your application folder. You can create multiple application within one project.
- DJANGO will create some more application related files for you in that folder. At any stage you can visit above link for clear understanding about those files.
- Now go one step back by CD..
- Type CODE . and hit enter it will load your project into VSCODE environment.
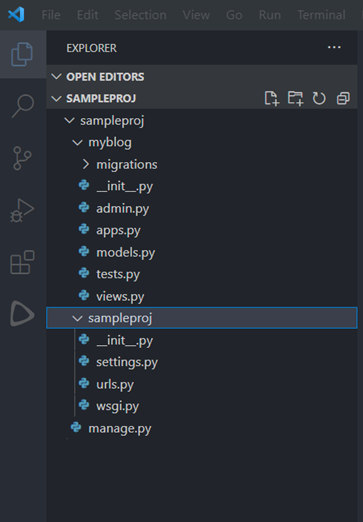
- Here you will be able to see whole project structure in navigator as below screen shot.
Build your first application
To build an application in DJANGO, we will modify some default files and off course we will make some new files for our project. Let’s do it step by step.
SETTING UP SETTINGS.PY
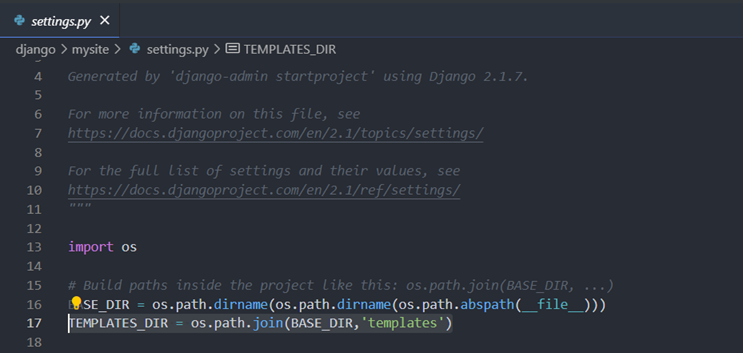
- Go to base project directory and create a new folder and name it as templates (Here we will put our HTML templates for the site) we also need to add path of this folder in SETTINGS.PY file.
- Go to SETTINGS.PY and add one line of code to tell DJANGO the path of templates (TEMPLATES_DIR = os.path.join(BASE_DIR. ‘templates’) see below screen shot.
3. In same SETTINGS.PY add your host address IP or name in the list of ALLOWED_HOSTS like.

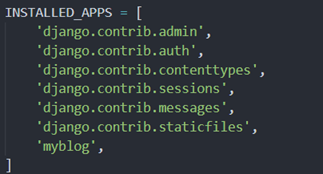
4. Append the INSTALLED_APPS list with your application name. Our application name is “myblog”.
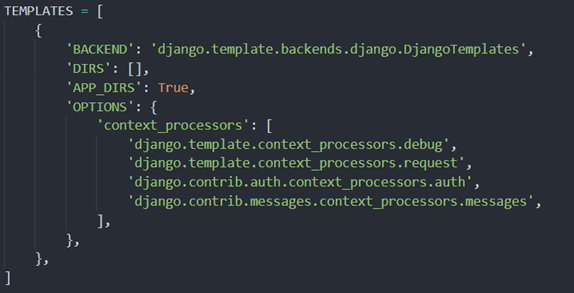
5. Now add the name of TEMPLATES_DIR (which we already defined in SETTINGS.PY earlier) in the list of dictionary. You can find this list in SETTINGS.PY with the name as TEMPLATES. By default it will look like.
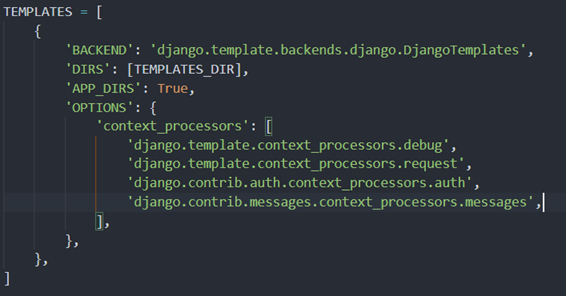
6. As you see in the figure above ‘DIRS’ key has empty list, we need to add our directory name here like.
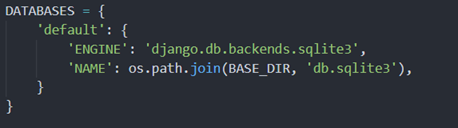
7. If you scroll down in SETTINGS.PY file you will see the data dictionary named “DATABASES” here you can create your database connections as many as you want. By default it offers you sqlite3 connection, you can use that for your application, but if you want to use postgres/oracle/mongodb then you need to add another child dictionary containing connection information of your choice database. (You need to install that database first). If you plan to use Postgresql, you need to install pgadmin first, you also need to install its client library (psycopg2) in your environment. If you plan to use Oracle, you need to install oracle database first. For mongodb you need to install mongodb first, but if you decide to use sqlite3 then you don’t need to install any database, Django will provide it to you. When you execute migration sqlite3 DB file automatically created. To browse sqlite3 database you need to install DB BROWSER (sqlite3).
#For postgresql add child dictionary in ‘DATABASES’ as:
'postgre': {
'ENGINE': 'django.db.backents.postgresql',
'NAME': 'databasename',
'USER': 'postgres',
'PASSWORD': 'postgres',
'HOST': 'localhost',
}
#For Oracle add child dictionary in ‘DATABASES’ as:
'oradb': {
'ENGINE': 'django.db.backents.oracle',
'NAME': 'databasename',
'USER': 'username',
'PASSWORD': 'password',
'HOST': 'localhost',
'PORT': '1521',
}
Default Database Settings
MODELS.PY
Now we are going to add a model (DATABASE TABLE) for our application.
- Expend myblog folder and open MODELS.PY. it only contains one line of import like.
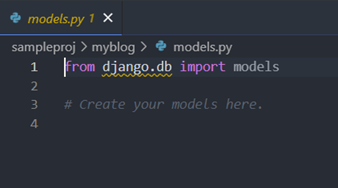
Write your model class here like.
from django.db import models
from django.contrib.auth.models import User


STATUS = (
    (0,"Draft"),
    (1,"Publish")
)

class Post(models.Model):
    title = models.CharField(max_length=200, unique=True)
    slug = models.SlugField(max_length=200, unique=True)
    author = models.ForeignKey(User, on_delete= models.CASCADE,related_name='blog_posts')
    updated_on = models.DateTimeField(auto_now= True)
    content = models.TextField()
    created_on = models.DateTimeField(auto_now_add=True)
    status = models.IntegerField(choices=STATUS, default=0)

    class Meta:
        ordering = ['-created_on']

    def __str__(self):
        return self.title
APPS.PY
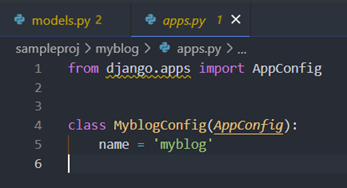
No need to change anything in this file leave it as is.
VIEWS.PY
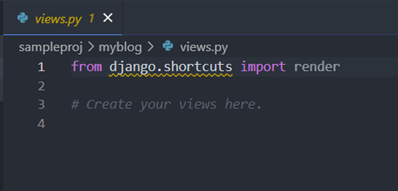
We are now going to write the code to render “Post” model data on the web.
- Open VIEWS.PY file, initially it will look like.
2. DJANGO allows us to write class base views (CBVs) and function base views (FBVs). Presently we are going to use default generic CBVs. You can use both of them in one VIEWS.PY file according to your needs.
from django.views import generic
from .models import Post


class PostList(generic.ListView):
    queryset = Post.objects.filter(status=1).order_by('-created_on')
    template_name = 'index.html'

class PostDetail(generic.DetailView):
    model = Post
    template_name = 'post_detail.html'
SITE TEMPLETES
As we have created the MODEL and VIEWS. It’s time to create a HTML templates to render beautified view of data on the screen.
- Go to TEMPLATES folder and create following files.
BASE.HTML
<!DOCTYPE html>
<html>
<head>
<title>ScriptsView</title>
<link
href="https://fonts.googleapis.com/css?family=Roboto:400,700"
rel="stylesheet">
<meta name="google" content="notranslate" />
<meta name="viewport" content="width=device-width, initial-scale=1" />
<link
rel="stylesheet"
href="https://maxcdn.bootstrapcdn.com/bootstrap/4.0.0/css/bootstrap.min.css"
integrity="sha384-Gn5384xqQ1aoWXA+058RXPxPg6fy4IWvTNh0E263XmFcJlSAwiGgFAW/dAiS6JXm"
crossorigin="anonymous"
/>
</head>
<body>
<style>
body {
font-family: "Roboto", sans-serif;
font-size: 17px;
background-color: #fdfdfd;
}
.shadow{
box-shadow: 0 4px 2px -2px rgba(0,0,0,0.1);
}
.btn-danger {
color: #fff;
background-color: #f00000;
border-color: #dc281e;
}
.masthead {
background:#3398E1;
height: auto;
padding-bottom: 15px;
box-shadow: 0 16px 48px #E3E7EB;
padding-top: 10px;
}
</style>
<!-- Navigation -->
<nav class="navbar navbar-expand-lg navbar-light bg-light shadow" id="mainNav">
<div class="container-fluid">
<a class="navbar-brand" href="{% url 'home' %}" >ScriptsView</a>
<button
class="navbar-toggler navbar-toggler-right"
type="button"
data-toggle="collapse"
data-target="#navbarResponsive"
aria-controls="navbarResponsive"
aria-expanded="false"
aria-label="Toggle navigation"
>
<span class="navbar-toggler-icon"></span>
</button>
<div class="collapse navbar-collapse" id="navbarResponsive">
<ul class="navbar-nav ml-auto">
<li class="nav-item text-black">
<a
class="nav-link text-black font-weight-bold"
href="#"
>About</a
>
</li>
<li class="nav-item text-black">
<a
class="nav-link text-black font-weight-bold"
href="#"
>Policy</a
>
</li>
<li class="nav-item text-black">
<a
class="nav-link text-black font-weight-bold"
href="#"
>Contact</a
>
</li>
</ul>
</div>
</div>
</div>
</nav>
{% block content %}
<!-- Content Goes here -->
{% endblock content %}
<!-- Footer -->
<footer class="py-3 bg-grey">
<p class="m-0 text-dark text-center ">Copyright © ScriptsView</p>
</footer>
</body>
</html>
INDEX.HTML
{% extends "base.html" %}
{% block content %}
<style>
body {
font-family: "Roboto", sans-serif;
font-size: 18px;
background-color: #fdfdfd;
}
.head_text{
color: white;
}
.card{
box-shadow: 0 16px 48px #E3E7EB;
}
</style>
<header class="masthead" >
<div class="overlay"></div>
<div class="container">
<div class="row">
<div class=" col-md-8 col-md-10 mx-auto">
<div class="site-heading">
<h3 class=" site-heading my-4 mt-3 text-white"> Welcome to ScriptsView - Tech Blog </h3>
<p class="text-light">Commited to share experiance with others.
</p>
</div>
</div>
</div>
</div>
</div>
</header>
<div class="container">
<div class="row">
<!-- Blog Entries Column -->
<div class="col-md-8 mt-3 left">
{% for post in post_list %}
<div class="card mb-4" >
<div class="card-body">
<h2 class="card-title">{{ post.title }}</h2>
<p class="card-text text-muted h6">{{ post.author }} | {{ post.created_on}} </p>
<p class="card-text">{{post.content|slice:":200" }}</p>
<a href="{% url 'post_detail' post.slug %}" class="btn btn-primary">Read More →</a>
</div>
</div>
{% endfor %}
</div>
{% block sidebar %}
{% include 'sidebar.html' %}
{% endblock sidebar %}
</div>
</div>
{%endblock%}
POST_DETAIL.HTML
{% extends 'base.html' %} {% block content %}

<div class="container">
  <div class="row">
    <div class="col-md-8 card mb-4  mt-3 left  top">
      <div class="card-body">
        <h1>{% block title %} {{ object.title }} {% endblock title %}</h1>
        <p class=" text-muted">{{ post.author }} | {{ post.created_on }}</p>
        <p class="card-text ">{{ object.content | safe }}</p>
      </div>
    </div>
    {% block sidebar %} {% include 'sidebar.html' %} {% endblock sidebar %}
  </div>
</div>

{% endblock content %}
SIDEBAR.HTML
{% block sidebar %}

<style>
        .card{
            box-shadow: 0 16px 48px #E3E7EB;
        }

</style>

<!-- Sidebar Widgets Column -->
<div class="col-md-4 float-right ">
<div class="card my-4">
        <h5 class="card-header">Author's note..</h5>
    <div class="card-body">
        <p class="card-text" style="text-align: center"> A growing number of viewers are looking for high quality, professional content on new technologies, which is hard to find. I am trying to fill that gap. I believe that anyone working with data can benefit from knowing Microsoft,Linux,Python, Oracle, Odoo, Django and PyQt. I took my hands on languages, frameworks and Database, and break them down into bite-size tutorials and blogs for everyone to have. My aim is to make this a sustainable project for myself and my viewers, so if you appreciate my blog/
        <a href="https://www.youtube.com/channel/UC5NYzuGBvBM8RS9_P73bmYw">Educational Channel</a> and are able support its existence, I would be grateful to you.Become my Supporter...!</p>
        <a href="#"
           class="btn btn-danger">Know more!</a>
    </div>
</div>
</div>

{% endblock sidebar %}
We are near to finish line, few more steps to go.
As we have created MODELS/VIEWS/TEMPLATES. Now we have to define SITE URLs to route the pages.
- Go to application folder and create a new file and name it as “urls.py” here we will define the routes of our site pages.
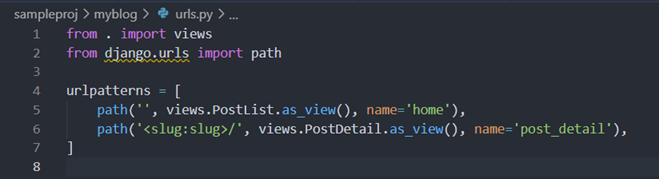
from . import views
from django.urls import path

urlpatterns = [
    path('', views.PostList.as_view(), name='home'),
    path('<slug:slug>/', views.PostDetail.as_view(), name='post_detail'),
]
2. Go to project level “URLS.PY” and include the site urls with admin.
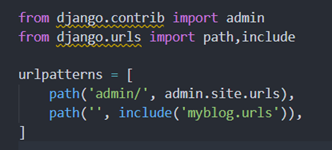
from django.contrib import admin
from django.urls import path,include

urlpatterns = [
    path('admin/', admin.site.urls),
    path('', include('myblog.urls')),
]
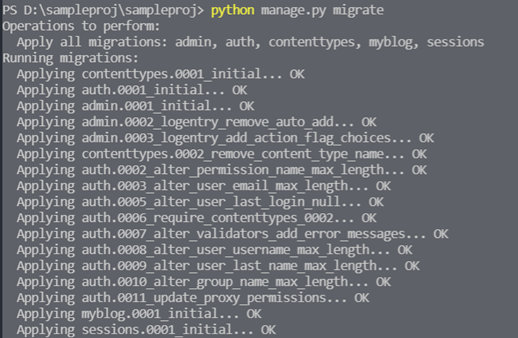
Finally we have to make our defined MODEL into SQLITE3 database, also we need to create site admin panel to perform administrative tasks. To do these task we have to run the table creation script into the database as:
To execute the scripts we need to run two commands at DOS prompt or VSCode terminal.
- Python manage.py makemigrations (it will go and see our MODELS.PY and create table creation scripts)

2. Python manage.py migrate (it will execute that script into database)
NOTE:
When we migrate first time DJANGO will migrate its default models along with our models, as you see in above screenshot that we just designed one model which was POST, but DJANGO migrated its authentication models and admin models for us (IT IS DJANGO’S DEFAULT BEAUTY). We will discuss about them in latter sessions.
You can run your web server now by executing:
python manage.py runserver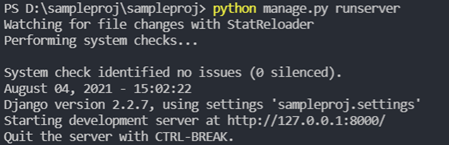
Creating Super User/Admin
python manage.py createsuperuserIt will create an admin superuser. It will ask for name and password of the superuser.
ADMIN.PY
To view your models in admin panel, you have register the modules of your app in admin.py. You can also tell DJANGO how do you like to to see your model form in admin panel, to do this you just need to add below lines in your admin.py as.
from django.contrib import admin
from . models import Post

class PostAdmin(admin.ModelAdmin):
    list_display = ('title', 'slug', 'status','created_on')
    list_filter = ("status",)
    search_fields = ['title', 'content']
    prepopulated_fields = {'slug': ('title',)}


admin.site.register(Post, PostAdmin)
I hope you will find this blog helpful for you. Your valuable comments and suggestions are always welcome.

My wife and i have been thrilled Louis could finish off his studies through the precious recommendations he obtained while using the web site. It’s not at all simplistic to just continually be releasing tips and tricks people today might have been trying to sell. And we all discover we’ve got the blog owner to give thanks to for this. The type of illustrations you made, the straightforward web site menu, the relationships you can assist to foster – it is mostly astonishing, and it’s leading our son and us believe that that idea is cool, which is certainly really indispensable. Thank you for all!