


By: Arif Khan
Hi there. Now as you see in session 1 of the subject tutorial, that we have downloaded and installed all pre-requisites. I hope that you too did the same. Now it’s time to start PyCharm and dive into our first robot framework project. Let’s start now step by step. Leave your comments if you find any difficulty in this tutorial.
Important note:
Add browser driver full path to OS environment variables, because browser driver must be accessible from the location of your project, to achieve if you add driver executable in the project directory, it will work but is not recommended, to add the driver path in OS environment variables is recommended. If you are working in Windows environment you may need to restart your system after adding the driver path in environment variables, otherwise, the system will not understand the driver path.
Open PyCharm and create new project as shown below.
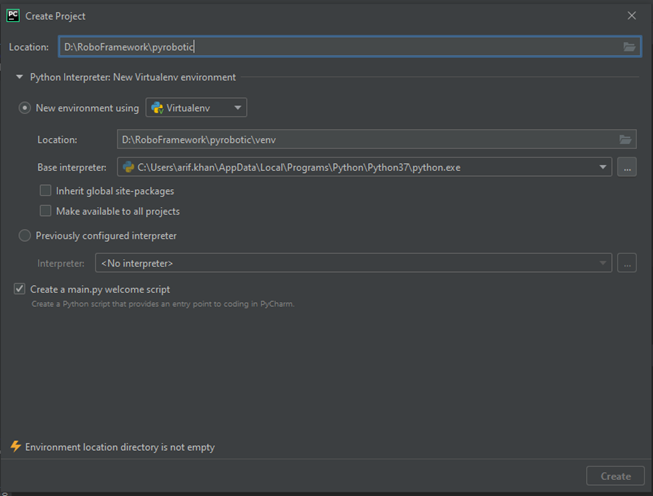
Setting up your project
Choose your desired location to store the project, preferably create a folder specific for robot project as I did, you can see in the image above, then in that folder write the name of your project, I recommend you to just follow me as I am doing at least for initial level. Use virtual environment. It is good practice to use a virtual environment as your other applications will not be harmed due to any library version conflict. PyCharm will automatically select the base interpreter, if not then enter the full path of your Python location as in the image, and hit Create button.
Once the project is created. You need to know the basic structure of Python automation projects, usually, we use the same structure as I am explaining to you guys. Now, under the node of your project name, you need to create four subfolders, every folder is very important. Following are the folders you need to create. You can see their hierarchy in the below image.
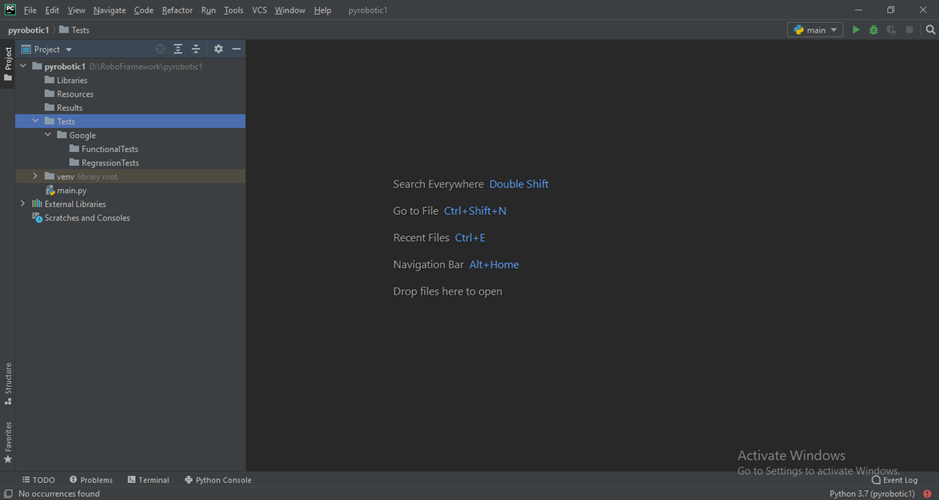
- Libraries (it will be used to store application specific custom libraries, which we need to create to perform test on some application)
- Resources (it will be used to store most commonly used keywords like open browser close browser and many more)
- Results (it will be used to store results of testing performed by the robot framework)
- Tests (it will be used to make product test cases. If you are testing more than one product. Under those cases folders you will write our magical robots)
- Test case name folders ( I our first project I name it as Google)
- As may tests you want to perform you can make their folders under Tests folder 2, 3 and so on.
Basically, it’s totally up to you how you want to structure your project, but I prefer to use the same structure as mine, it is easy to understand I think.
Hope you understand the structure, don’t confuse if you are feeling any difficulty understanding. Everything will be explained to you when its time comes. For now, do as directed.
That’s all for this session. Hope you understand what I tried to tell you in this session. In the next session, we will write our first test InshaAllah.
Feel free to comment or to ask any question in below section. It will be my pleasure to hear from you.

Hurrah, that’s what I was searching for, what a material!
existing here at this webpage, thanks admin of this website.
An outstanding share! Ive just forwarded this onto a associate who has been conducting a tiny research upon this. And he actually bought me lunch helpfully because I stumbled upon it for him lol. so allow me to reword this. Thanks for the meal!! But yeah, thanks for spending the period to discuss this concern here on your web page.
This is really interesting, You’re a very skilled blogger.
I have joined your feed and look forward to seeking of your great post.
Also, I have shared your website in my social networks!