By: Arif Khan
Hi there. I hope that you will find this tutorial full of knowledge and interesting, especially those who are doing manual app testing and want to enhance their progress and accuracy in their working performance. Those newbies will also find this tutorial very interesting, who want to start their journey in the field of this huge and infinite world of I.T. I will try my level best to transfer as many information and knowledge as I know about it. Just like my late Father did with me, he taught me everything he knows about everything he know, he never leave me un-answered ever. May his soul rest in peace in the haven and All Mighty God bestow his blessing on him.
I hope that you will gain adequate knowledge out from this series.
In this tutorial we will discuss about Python Robot Framework and cover following steps. So, without wasting more time let’s dive into our first blog of this interesting and automated series. Below are the three steps you should know before starting to work with any of the automation tool. Below we are talking about Robotframework.
- Introduction of Robot Framework.
- Framework installation Pre-requisites.
- Development Environment setup. Step by Step.
What is Robot Framework?
Its open source test automation framework that is why we don’t have to pay a single penny for using it. Robot framework was initially developed by Pekk Klarck at Nokia Networks. The core framework is implemented using Python and runs also on Jython (JVM) and IronPython. It utilizes the keyword-driven testing approach, it also OS and application independent. Its testing capabilities can be extended by test libraries which are implemented either with Python or Java.
Pre-requisites
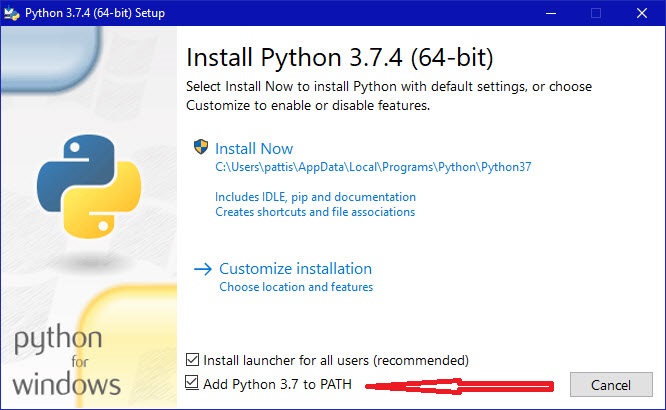
First of all you need to install Python3, it is very nice if already have it installed in your system, but if not, then you have to install it from http://python.org, secondly we need to add Python path in environment variables, python ask you about adding its path to environment variables during installation process. Don’t forget to check selection box when it ask you as seen in below image. Thirdly we need to install Robotframework using pip3 (pip3 install robotframework) then you have to install robotframework-seleniumlibrary using pip3 (pip3 install robotframework-seleniumlibrary). Although if we directly install robotframework-seleniumlibrary it will automatically install robotframework if it is not installed previously. PIP3 COMMANDS WILL RUN ON COMMAND PROMPT. So, you can install it either ways.
Development Environment setup
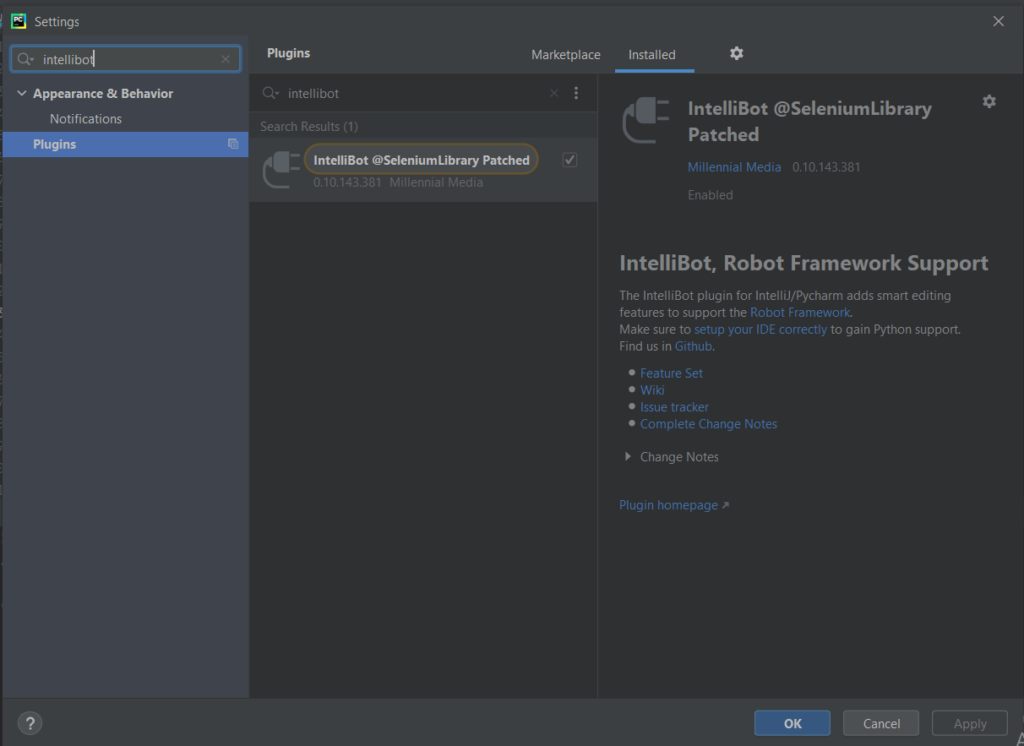
Finally we need IDE which is Pycharm, you could download this IDE from https://www.jetbrains.com/pycharm/download/#section=windows . Pycharm is very easy and user friendly, after Pycharm installation we need to add intellibot plugin. To add this plugin go to File/Settings and look for Intellibot as shown in screenshot.
Lastly you need to have Selenium browser driver to drive any brower, to download driver visit http://selenium.dev . we will discuss about it in detail in our upcoming blogs while working on it. One more last thing you need to do, put Selenium browserdriver in a folder and enter the folder complete path in environment variables.
That’s all guys. After having everything installed in your system you will be ready to do the magic.
I don’t want to leave a boring long text document for you, as we all are not habitual to read the long documents, actually I am not. But above things were very necessary to tell you before start, that is why I wrote them for you. You will also find the VIDEOS with each of my blog on this topic, do watch them, do practice, because practice makes perfect. See you in the next blog very soon InshAllah.
Feel free to comment or ask any question in comment section below, it will be my pleasure to hear from you guys.


